All chairs sold in the US and Canada now come with Quick Release rear wheel axles.
The instructions for assembling these wheels can be found here .
Chairs also now come with anti-tip bars!
Instructions for the anti-tip bars can be found here .
Transcription for this video: RoughRider Wheelchair Assembly
RoughRider Wheelchair Assembly
This video shows assembly instructions for the Whirlwind RoughRider wheelchair. For more detailed assembly instructions and information on service provision, see whirlwindwheelchair.org/roughrider-support.
Tools.
These tools are useful for assembly of the wheelchairs. (13, 19mm socket; 10, 13, 19mm wrench; + and – screwdrivers; mallet; pump)
Unpacking the Wheelchair
Unpack the box. Notice the cushion, user manual, backrest cover, caster wheels, accessory kit, pump, two rear wheels, and wheelchair frame.
Caster Assembly
To install the caster wheels, remove the nut from the caster stem and make sure the washer is installed between the fork and the wheelchair. Thread on the nut and tighten very firmly with a socket wrench or the socket provided in the toolkit. Make sure the caster spins freely. Tap the plastic caps in place with a wooden or rubber mallet.
Rear wheels
Remove the packing from the rear wheels. Be careful not to scratch the hand rim paint. Make sure the valve stem is straight. Inflate the tires. Inflate between 45 and 55 pounds per square inch (3 – 3.8 Bar). Replace the valve cap. Determine which axel position is required. Refer to whirlwindwheelchair.org/service for more information on measurements and wheelchair setup. Remove the axel bolt from the accessory bag. Remove the nut and spacer and insert the bolt so that the head is recessed in the hub. Install the spacer over the bolt and install the axel through the appropriate hole in the axel block. The hand rim should face away from the wheelchair frame. Install the nut. Tighten firmly with a 19mm wrench and socket. Make sure the wheel spins freely.
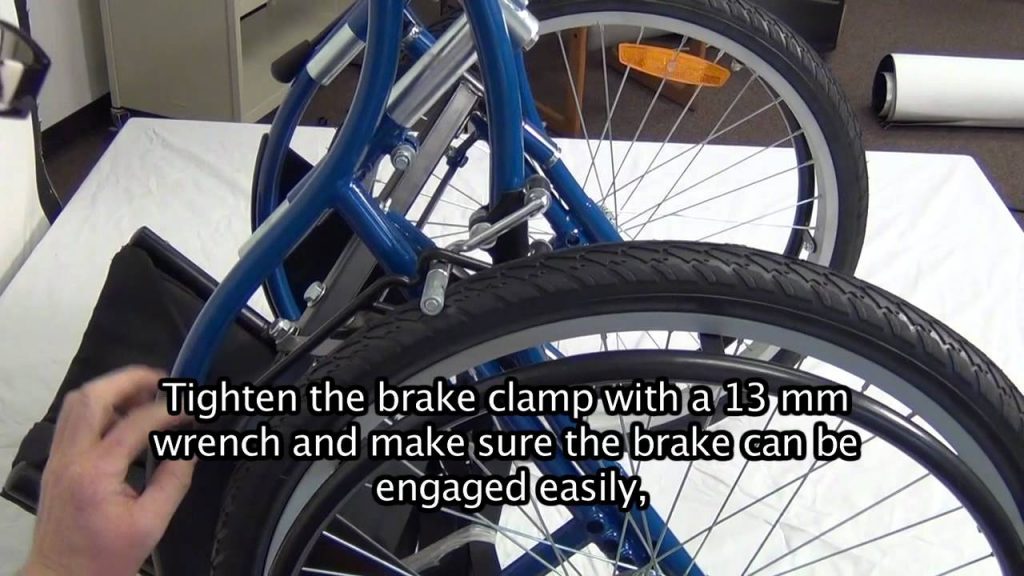
Adjusting the brakes
Remove the wrapping from the brakes. Slide the brake clamp to a position where the brake engages firmly with the tire, but is still easy to operate. Use a mallet if needed to move the brake clamp. Tighten the brake clamp with a 13mm wrench and make sure the brake can be engaged easily, holds the wheel when it is engaged, cannot be turned from side to side around the clamp, and that the brake handle can move without touching the wheelchair frame.
Special Adjustment Rear Axle Position (5th axle position)
To use the rear axle hole, it may be necessary to remove the wedge from the brake clamp. First, install the wheels in the rear axle position. To remove this wedge, first position the clamp between the two curves on the wheelchair frame. Remove the nut from the brake clamp. Slide out the bolt, tapping with a hammer if necessary. Remove the wedge. Reinstall the clamp bolt with the flattened part facing downward towards the wheelchair tube. Adjust the clamp and tighten.
Backrest Installation
Remove the wrapping from the backrest straps. Swivel the backrest canes outward from the front of the chair towards the back. There are three backrest heights (High backrest; middle backrest; low backrest). The straps must be adjusted for each height. The straps are pre-installed for the high backrest height. To set up the backrest in the highest position, slide the backrest canes up until the bottom hole can be seen through the backrest hole. Install the hook and loop tab onto the backrest bolt, which can be found in the accessory bag. Make sure the softer “loop” part is facing out. Swivel the backrest cane slightly, or tap gently to make the installation easier. Tighten the backrest bolts with a 13mm socket and wrench while holding the backrest tab vertical. Make sure that none of the straps are too tight so as to prevent the wheelchair seat to be stretched tight when opened. Adjust all the back straps to be equally tensioned with the wheelchair fully opened.
Backrest Cover
Install the backrest cover as shown, with the logo on the back of the wheelchair and the wings fastened around the top of the backrest canes. There is a seam that should be positioned at the top of the wheelchair backrest. The backrest should lie flat and be even on all sides. Secure the two straps from the front and back of the cover, below the bottom backrest strap.
Changing Backrest Height
Fold the chair slightly. Remove the backrest bolts. There are three backrest height positions. The backrest cane and straps must be moved to change positions. For the highest position, use the bottom hole in the backrest cane and there will be two straps below the backrest bolt. For the middle position, use the center hole in the backrest cane and there will be three straps below the backrest bolt. For the lowest position, use the top hole in the backrest cane and there will be four straps below the backrest bolt. Detach the hook and loop on the backrest straps, unthread the buckles and reposition the straps as needed. There should always be two straps in the gap behind the fender. Insert the backrest bolt into the correct hole for the selected backrest height. Thread the backrest straps through two slots in the buckle, and secure the hook and loop tabs. Re-attach the hook and loop tabs and tighten the backrest straps so that all the straps are evenly tensioned while the seat is fully opened. Replace the backrest cover.
Adjusting the Footrest Height
To change the footrest height, loosen the footrest clamp bolt using a 13mm wrench and socket. Slide the footrest tube to the required height and tighten the clamp bolt. Make sure the bolt is tightened enough that the footrest does not rotate.
Special Adjustment: Seat Extension.
If a longer seat depth is needed, install the seat extension. On both sides of the seat, remove the front bolt in the seat with a Phillips screwdriver. It is under the hook and loop. Remove the plastic plugs. Remove the long bolt from the seat extension, and insert the seat extension in one side with the strap on the top. Slide the long bolt all the way through the seat extension and out the bottom of the seat tube. Install the lock nut on the bottom of the seat extension bolt, and tighten with a screwdriver and a 13mm wrench. Fold the chair slightly, and install the second seat extension. You can twist the seat extension slightly to help line up the holes. Finally, open the seat fully and detach the flap of the seat fabric from under the seat and stretch it over the strap. Re-attach with the hook and loop.
Final check
Fold and open the chair completely, and test-ride the chair. Refer to the RoughRider Assembly Manual for more information on assembly.